Phantom 4 RTK Network RTK Setup Guide
1. Insert a WB37 Intelligent battery into the Phantom 4 RTK remote controller, turn on the
remote controller by quickly press twice and then hold the power button.
2. Insert a Phantom 4 Intelligent Flight Battery into the Phantom 4 RTK aircraft and turn on
the aircraft by quickly press twice and then hold the power button located on the battery.
Wi-Fi Connection:
On the home screen, scroll down from the top of the screen to show the notification center,
enable Wi-Fi connection by tap on the “Wi-Fi” icon once, tap and hold the “W-Fi” icon to
enter the Wi-Fi setting page. Under Wi-Fi settings page you can connect the remote
controller with your local Wi-Fi network.
Test procedure: Press the remote controller power button once, then press again and hold
to turn the remote controller on. In the DJI GS RTK app tap and select Network
Diagnostics. If the statuses of all the devices in the network chain are shown in green, the
dongle and the SIM card are functioning properly.
4G LTE Connection:
Install a compatible 4G LTE Dongle* as follow: 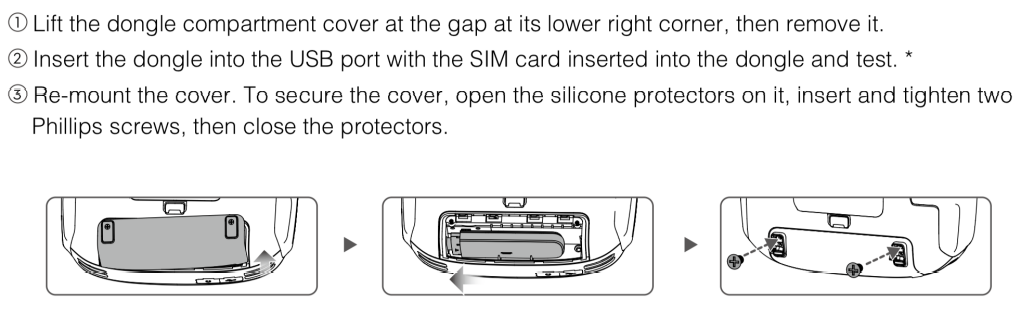
Test procedure: Press the remote controller power button once, then press again and hold to
turn the remote controller on. In the DJI GS RTK app tap and select Network
Diagnostics. If the statuses of all the devices in the network chain are shown in green the
dongle and SIM card are functioning properly.
* LTE FDD B1/2/3/4/5/7/8/12&B17/20, UMTS B1/2/4/5/8, GSM 850/900/1800/1900 supported
is recommended in North America.
5. Check if both aircraft and the remote controller is running the latest official firmware. Then
select “Fly” on the main screen to enter the camera view of the Phantom 4 RTK.
6. Under camera view window, tap the on the upper right corner of the screen to enter
the main settings menu, and then select to enter RTK setting page. Turn on the RTK
function and select “Custom network RTK” as RTK Service Type.
7. Input your NTRIP Host name, Port number, User account, Password and Mountpoint
provided by the network RTK provider under RTK settings to config the Ntrip. Then tap
“Connect” to proceed:
(We recommend to select the closest mount-point for better data accuracy)
8. Check if the page shows the “Connection Success” message next to “Custom network
RTK Status” and the fixed GPS coordinate of the station shows under “RTK Settings” page:
9. If position shows “FLOAT” under RTK status list and error (“Cannot take off. -Weak RTK
Signal”) shows up on the camera view, reposition the Phantom 4 RTK aircraft on a flat field with
minimal surrounding obstacles and then wait for few minutes to gain more GPS/GNSS satellite
signal:
Once the GPS/GNSS signal is sufficient for operation, the error would automatically disappear,
the aircraft position status would be changed to “FIX” on the status bar and “RTK Settings”
page:
Network RTK is now connected, and the Phantom 4 RTK should be ready for operation.